<?xml version="1.0" encoding="utf-8"?><feed xmlns="http://www.w3.org/2005/Atom" ><generator uri="https://jekyllrb.com/" version="3.10.0">Jekyll</generator><link href="https://tomkadwill.com/feed.xml" rel="self" type="application/atom+xml" /><link href="https://tomkadwill.com/" rel="alternate" type="text/html" /><updated>2025-04-29T07:13:40+00:00</updated><id>https://tomkadwill.com/feed.xml</id><title type="html">Tom Kadwill</title><subtitle>Tom Kadwill&apos;s site</subtitle><entry><title type="html">Running Great 1:1 Meetings</title><link href="https://tomkadwill.com/running-great-1-to-1-meetings" rel="alternate" type="text/html" title="Running Great 1:1 Meetings" /><published>2025-01-08T06:48:00+00:00</published><updated>2025-01-08T06:48:00+00:00</updated><id>https://tomkadwill.com/running-great-1-to-1-meetings</id><content type="html" xml:base="https://tomkadwill.com/running-great-1-to-1-meetings"><![CDATA[<p>This month I challenged myself to run better 1:1s. I’ve been in the industry for 13 years so I’ve done a lot of 1:1s. Either as a manger and with my manager. But lately I felt I could do better. My 1:1s were often stilted and unproductive. I felt I was just going through the motions. Bad 1:1s are a waste of time for everyone and cause people to feel unsupported.</p>

<p>This month I tried to improve. I interviewed friends in the industry and consumed some great content. Here’s what I learned:</p>

<h2 id="1-prepare-good-questions">1. Prepare good questions</h2>

<p>Ideally, 1:1 meetings should be driven by the report. But, in my experience, most people do not prepare and are not comfortable driving their 1:1s. If that’s the case, the manager must be proactive.</p>

<p>In preparation, I spend a little time before each 1:1 thinking about questions I’d like to ask. Here are some example:</p>

<ul>
  <li>What is worrying you most at the moment?</li>
  <li>Did you see the bit about AWS lambdas at the engineering all hands on tuesday?</li>
  <li>Do you think there’s anything I’m missing about our current projects? Anything you think I don’t understand fully?</li>
  <li>Have you spent much time pairing with Ben? If so, how was it?</li>
</ul>

<p>These questions are useful to fall back on when conversation isn’t flowing naturally.</p>

<p>Preparing questions improved my 1:1s significantly. It shows the person I care and I’ve thoughts about them and I’ve put some effort into the meeting, so they should too.</p>

<h2 id="2-keep-notes">2. Keep notes</h2>

<p>In the past I haven’t taken notes in 1:1s. It’s extra effort and I felt it would distract me from the conversation. My research told me I was wrong so I experimented with keeping notes.</p>

<p>I found note taking helps me focus on what I’m hearing and retain information. It also demonstrates that information exchanged in 1:1s is important. Meeting aren’t jollies where we chat and forget about it. Keeping notes allows me to refer back and record actions.</p>

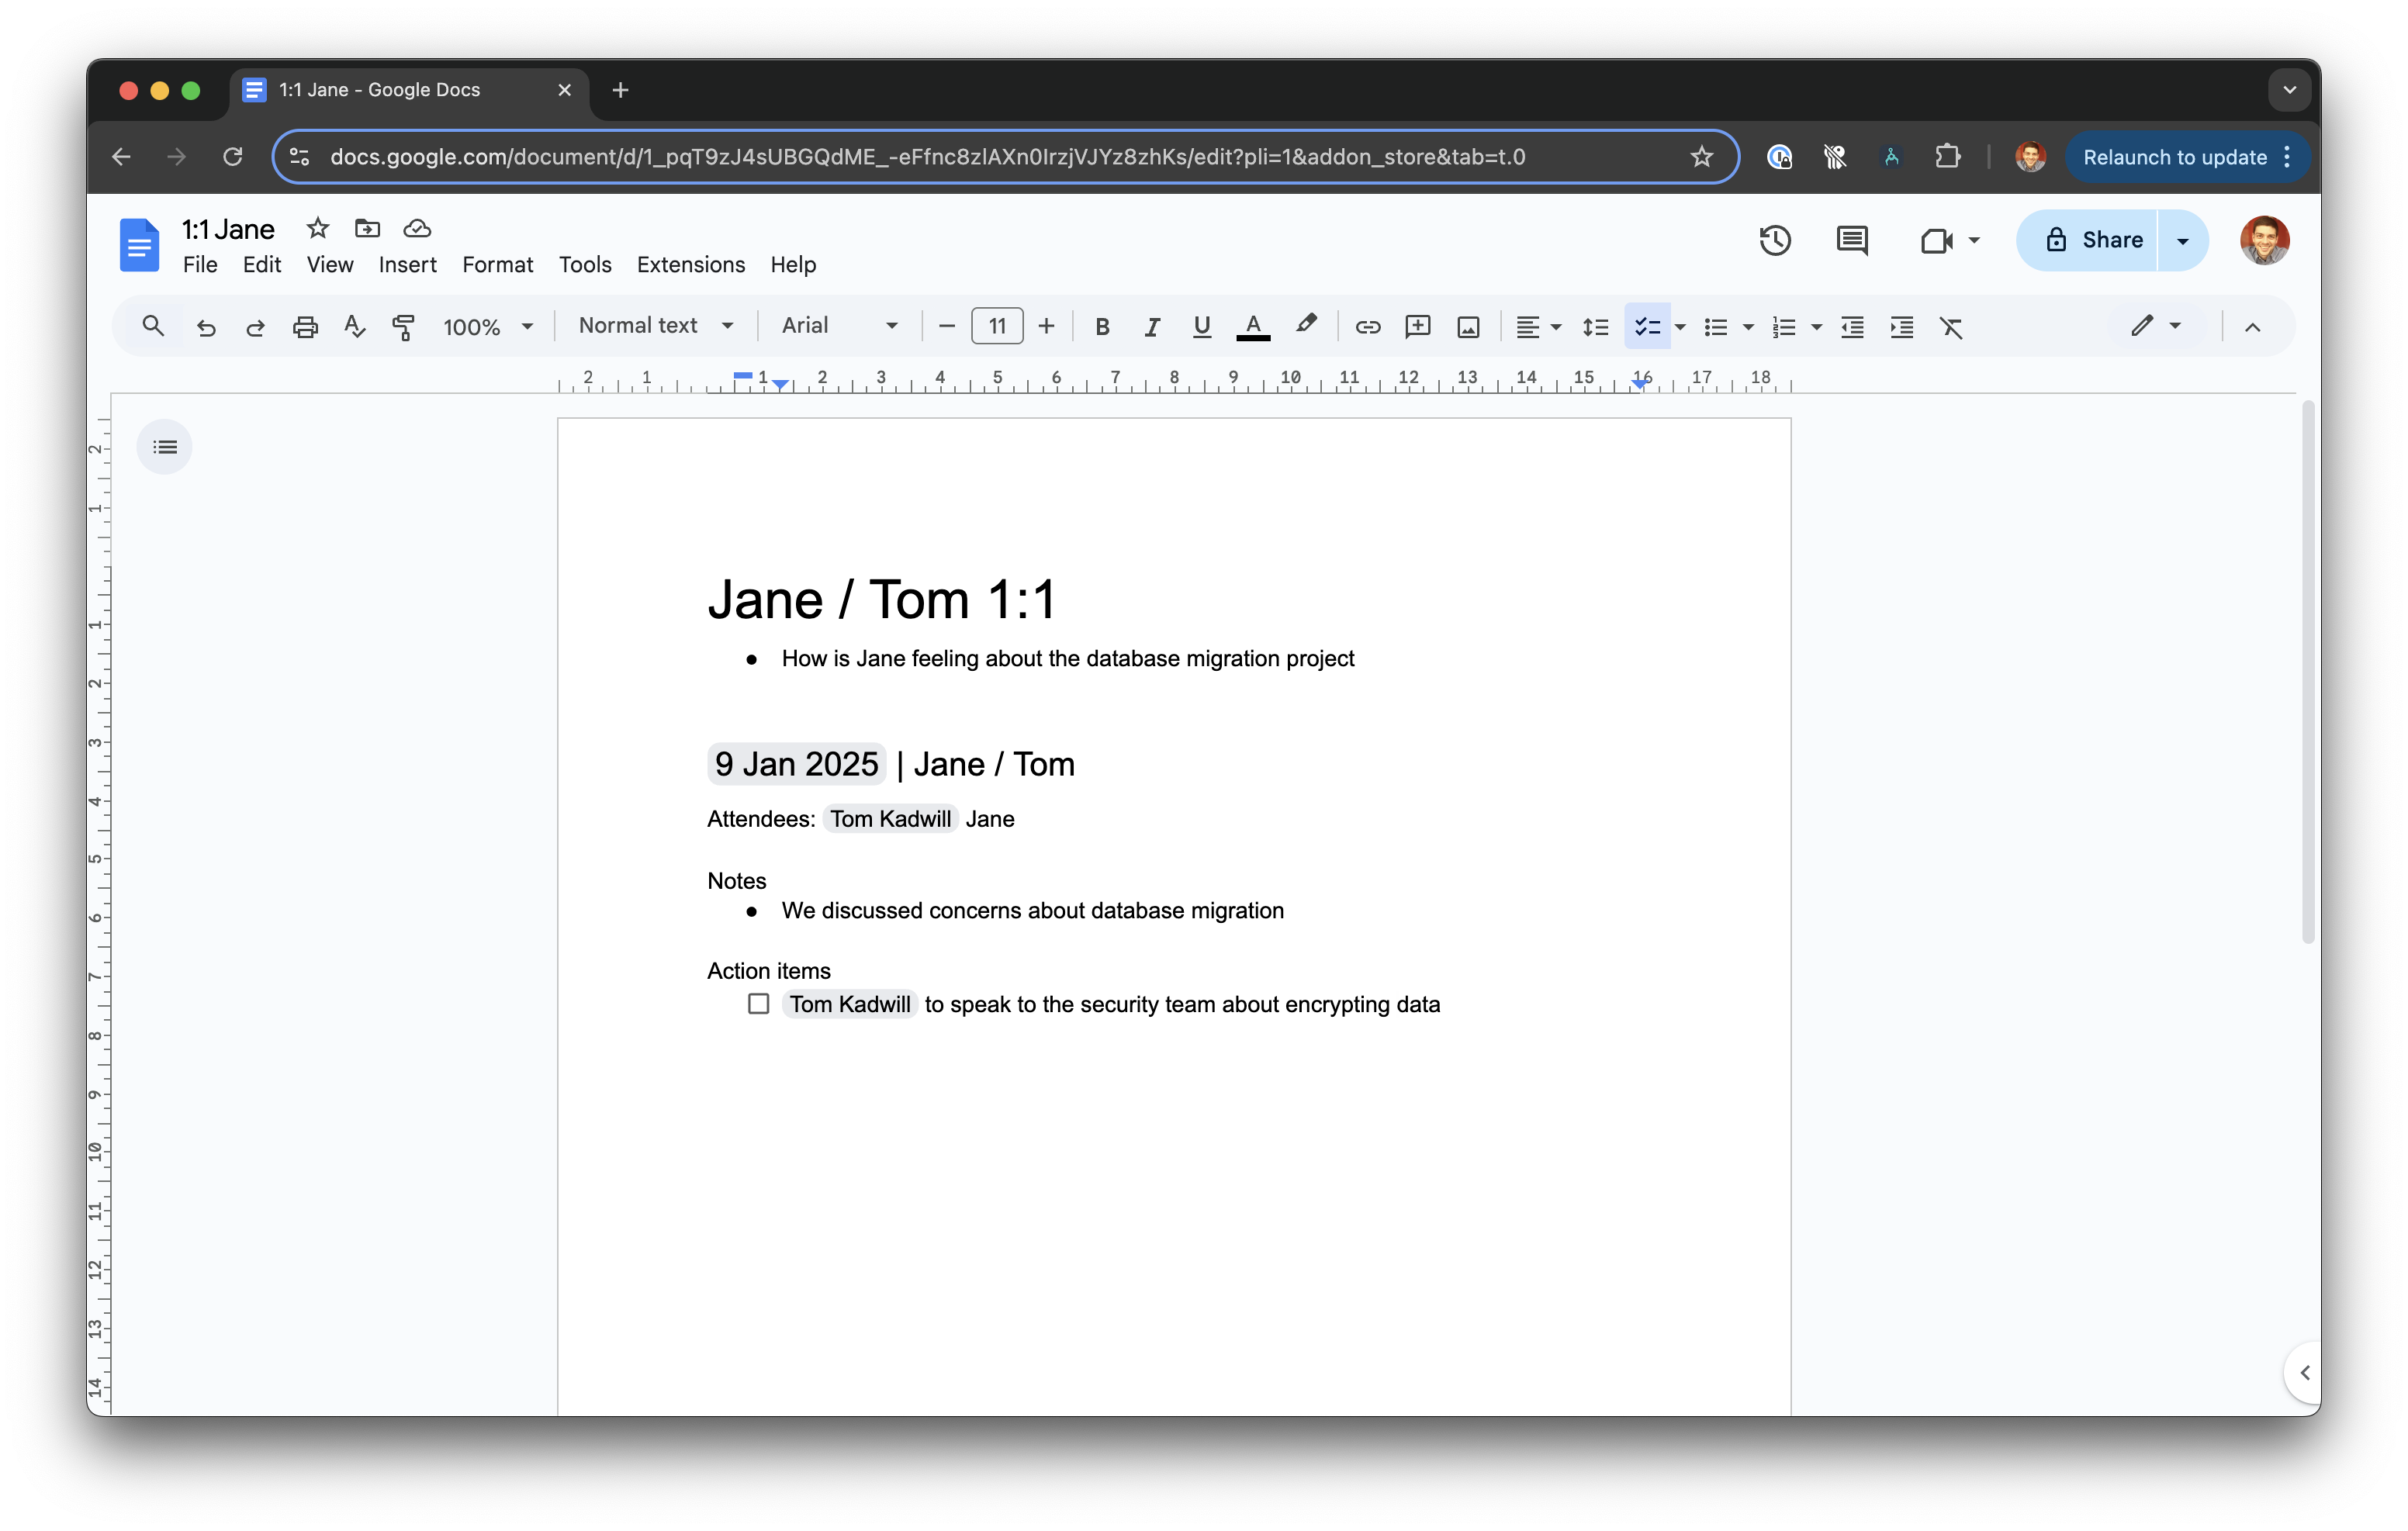
<p>To minimise the overhead, I’m using a very light weight Google Doc which looks like this:</p>

<p><img src="/assets/running-great-1-to-1-meetings/1-1-google-doc.png" alt="1:1 Google Doc" /></p>

<p>Google Docs has a nice feature which auto populates the meeting. I typically do this 5 mins before the meeting whilst thinking about questions to ask. I add those questions at the top and fill out meeting notes during the meeting.</p>

<h2 id="3-circle-back-to-previous-11s">3. Circle back to previous 1:1s</h2>

<p>Having a note system in place allows me to circle back. I try not to be too ridged about it but make an effort to review past 1:1 notes &amp; actions.</p>

<p>1:1s have two main benefits - strengthening relationships &amp; making improvements. Following up on actions is how we make improvements. It also builds trust by demonstrating that things raised during 1:1s actually get addressed.</p>

<h2 id="4-enjoy-11s">4. Enjoy 1:1s!</h2>

<p>I never dreaded 1:1s but I can’t say I was excited about them. Especially when I was busy I thought time could be better spent elsewhere. I’m sure that energy was apparent to the other person.</p>

<p>To improve, I made an effort to look forward to each 1:1 as an opportunity to connect with the person and learn. I tried to listen attentively and bring positive energy.</p>

<p>Harry Stebbings, podcaster and VC has a quote that’s a little over the top but helps put my in the right frame of mind: <em>“go into every meeting saying, I want this to be that person’s best meeting, and I’m gonna fucking bring it”</em>.</p>

<p>I’m enjoying 1:1s more because I’m actually learning things about the project and uncovering things for further investigation.</p>

<p>Results of the experiment</p>

<p>After a month, here are the results of my experiment:</p>

<ol>
  <li>I enjoy 1:1s more (and think my reports do too).</li>
  <li>1:1s feel less stilted and I’m improving relationships with team members.</li>
  <li>I’m learning more about our projects &amp; getting useful feedback.</li>
  <li>I’m having deep conversations and actually solving problems. 1:1s have become productive! One afternoon I had back to back 1:1s and discussed our release process, in detail, with both engineers. I came away with an action plan for how to improve things.</li>
</ol>]]></content><author><name></name></author><category term="newsletter" /><summary type="html"><![CDATA[This month I challenged myself to run better 1:1s. I’ve been in the industry for 13 years so I’ve done a lot of 1:1s. Either as a manger and with my manager. But lately I felt I could do better. My 1:1s were often stilted and unproductive. I felt I was just going through the motions. Bad 1:1s are a waste of time for everyone and cause people to feel unsupported.]]></summary></entry><entry><title type="html">Rails API Tutorial, Part 6: Destroy Controller Action</title><link href="https://tomkadwill.com/rails-api-tutorial-part-6-destroy-controller-action" rel="alternate" type="text/html" title="Rails API Tutorial, Part 6: Destroy Controller Action" /><published>2020-08-10T06:48:00+00:00</published><updated>2020-08-10T06:48:00+00:00</updated><id>https://tomkadwill.com/rails-api-tutorial-part-6-destroy-controller-action</id><content type="html" xml:base="https://tomkadwill.com/rails-api-tutorial-part-6-destroy-controller-action"><![CDATA[<p>Welcome to the Rails 6 API tutorial. In this series we’ll walk through building a backend API using Ruby on Rails. The topics in this series include:</p>

<ol>
  <li><a href="/rails-api-tutorial-part-1-create-rails-api-project-and-routing">Creating a Rails API Project and Routing</a></li>
  <li><a href="/rails-api-tutorial-part-2-basic-controllers-and-models">Basic Controller and Models</a></li>
  <li><a href="/rails-api-tutorial-part-3-building-a-post-endpoint">Building a POST Endpoint</a></li>
  <li><a href="/rails-api-tutorial-part-4-http-status-codes">HTTP Status Codes</a></li>
  <li><a href="/rails-api-tutorial-part-5-active-record-validations">Active Record Validations</a></li>
  <li><a href="/rails-api-tutorial-part-6-destroy-controller-action">Destroy Controller Action</a></li>
  <li><a href="/rails-api-tutorial-part-7-exception-handling-in-controllers">Exception Handling in Controllers</a></li>
</ol>

<style>.embed-container { position: relative; padding-bottom: 56.25%; height: 0; overflow: hidden; max-width: 100%; } .embed-container iframe, .embed-container object, .embed-container embed { position: absolute; top: 0; left: 0; width: 100%; height: 100%; }</style>
<div class="embed-container"><iframe src="https://www.youtube.com/embed//kzdE91zIp-k" frameborder="0" allowfullscreen=""></iframe></div>]]></content><author><name></name></author><summary type="html"><![CDATA[Welcome to the Rails 6 API tutorial. In this series we’ll walk through building a backend API using Ruby on Rails. The topics in this series include:]]></summary></entry><entry><title type="html">Rails API Tutorial, Part 7: Exception Handling in Controllers</title><link href="https://tomkadwill.com/rails-api-tutorial-part-7-exception-handling-in-controllers" rel="alternate" type="text/html" title="Rails API Tutorial, Part 7: Exception Handling in Controllers" /><published>2020-08-10T06:48:00+00:00</published><updated>2020-08-10T06:48:00+00:00</updated><id>https://tomkadwill.com/rails-api-tutorial-part-7%20copy</id><content type="html" xml:base="https://tomkadwill.com/rails-api-tutorial-part-7-exception-handling-in-controllers"><![CDATA[<p>Welcome to the Rails 6 API tutorial. In this series we’ll walk through building a backend API using Ruby on Rails. The topics in this series include:</p>

<ol>
  <li><a href="/rails-api-tutorial-part-1-create-rails-api-project-and-routing">Creating a Rails API Project and Routing</a></li>
  <li><a href="/rails-api-tutorial-part-2-basic-controllers-and-models">Basic Controller and Models</a></li>
  <li><a href="/rails-api-tutorial-part-3-building-a-post-endpoint">Building a POST Endpoint</a></li>
  <li><a href="/rails-api-tutorial-part-4-http-status-codes">HTTP Status Codes</a></li>
  <li><a href="/rails-api-tutorial-part-5-active-record-validations">Active Record Validations</a></li>
  <li><a href="/rails-api-tutorial-part-6-destroy-controller-action">Destroy Controller Action</a></li>
  <li><a href="/rails-api-tutorial-part-7-exception-handling-in-controllers">Exception Handling in Controllers</a></li>
</ol>

<style>.embed-container { position: relative; padding-bottom: 56.25%; height: 0; overflow: hidden; max-width: 100%; } .embed-container iframe, .embed-container object, .embed-container embed { position: absolute; top: 0; left: 0; width: 100%; height: 100%; }</style>
<div class="embed-container"><iframe src="https://www.youtube.com/embed//RQQ98mbh2Ic" frameborder="0" allowfullscreen=""></iframe></div>]]></content><author><name></name></author><summary type="html"><![CDATA[Welcome to the Rails 6 API tutorial. In this series we’ll walk through building a backend API using Ruby on Rails. The topics in this series include:]]></summary></entry><entry><title type="html">Rails API Tutorial, Part 7: Exception Handling in Controllers</title><link href="https://tomkadwill.com/rails-api-tutorial-part-7-exception-handling-in-controllers" rel="alternate" type="text/html" title="Rails API Tutorial, Part 7: Exception Handling in Controllers" /><published>2020-08-10T06:48:00+00:00</published><updated>2020-08-10T06:48:00+00:00</updated><id>https://tomkadwill.com/rails-api-tutorial-part-7</id><content type="html" xml:base="https://tomkadwill.com/rails-api-tutorial-part-7-exception-handling-in-controllers"><![CDATA[<p>Welcome to the Rails 6 API tutorial. In this series we’ll walk through building a backend API using Ruby on Rails. The topics in this series include:</p>

<ol>
  <li><a href="/rails-api-tutorial-part-1-create-rails-api-project-and-routing">Creating a Rails API Project and Routing</a></li>
  <li><a href="/rails-api-tutorial-part-2-basic-controllers-and-models">Basic Controller and Models</a></li>
  <li><a href="/rails-api-tutorial-part-3-building-a-post-endpoint">Building a POST Endpoint</a></li>
  <li><a href="/rails-api-tutorial-part-4-http-status-codes">HTTP Status Codes</a></li>
  <li><a href="/rails-api-tutorial-part-5-active-record-validations">Active Record Validations</a></li>
  <li><a href="/rails-api-tutorial-part-6-destroy-controller-action">Destroy Controller Action</a></li>
  <li><a href="/rails-api-tutorial-part-7-exception-handling-in-controllers">Exception Handling in Controllers</a></li>
</ol>

<style>.embed-container { position: relative; padding-bottom: 56.25%; height: 0; overflow: hidden; max-width: 100%; } .embed-container iframe, .embed-container object, .embed-container embed { position: absolute; top: 0; left: 0; width: 100%; height: 100%; }</style>
<div class="embed-container"><iframe src="https://www.youtube.com/embed//RQQ98mbh2Ic" frameborder="0" allowfullscreen=""></iframe></div>]]></content><author><name></name></author><summary type="html"><![CDATA[Welcome to the Rails 6 API tutorial. In this series we’ll walk through building a backend API using Ruby on Rails. The topics in this series include:]]></summary></entry><entry><title type="html">Rails API Tutorial, Part 5: Active Record Validations</title><link href="https://tomkadwill.com/rails-api-tutorial-part-5-active-record-validations" rel="alternate" type="text/html" title="Rails API Tutorial, Part 5: Active Record Validations" /><published>2020-07-21T06:48:00+00:00</published><updated>2020-07-21T06:48:00+00:00</updated><id>https://tomkadwill.com/rails-api-tutorial-part-5-active-record-validations</id><content type="html" xml:base="https://tomkadwill.com/rails-api-tutorial-part-5-active-record-validations"><![CDATA[<p>Welcome to the Rails 6 API tutorial. In this series we’ll walk through building a backend API using Ruby on Rails. The topics in this series include:</p>

<ol>
  <li><a href="/rails-api-tutorial-part-1-create-rails-api-project-and-routing">Creating a Rails API Project and Routing</a></li>
  <li><a href="/rails-api-tutorial-part-2-basic-controllers-and-models">Basic Controller and Models</a></li>
  <li><a href="/rails-api-tutorial-part-3-building-a-post-endpoint">Building a POST Endpoint</a></li>
  <li><a href="/rails-api-tutorial-part-4-http-status-codes">HTTP Status Codes</a></li>
  <li><a href="/rails-api-tutorial-part-5-active-record-validations">Active Record Validations</a></li>
  <li><a href="/rails-api-tutorial-part-6-destroy-controller-action">Destroy Controller Action</a></li>
  <li><a href="/rails-api-tutorial-part-7-exception-handling-in-controllers">Exception Handling in Controllers</a></li>
</ol>

<style>.embed-container { position: relative; padding-bottom: 56.25%; height: 0; overflow: hidden; max-width: 100%; } .embed-container iframe, .embed-container object, .embed-container embed { position: absolute; top: 0; left: 0; width: 100%; height: 100%; }</style>
<div class="embed-container"><iframe src="https://www.youtube.com/embed//yfDWO6JK0tw" frameborder="0" allowfullscreen=""></iframe></div>]]></content><author><name></name></author><summary type="html"><![CDATA[Welcome to the Rails 6 API tutorial. In this series we’ll walk through building a backend API using Ruby on Rails. The topics in this series include:]]></summary></entry><entry><title type="html">Rails API Tutorial, Part 3: Building a POST Endpoint</title><link href="https://tomkadwill.com/rails-api-tutorial-part-3-building-a-post-endpoint" rel="alternate" type="text/html" title="Rails API Tutorial, Part 3: Building a POST Endpoint" /><published>2020-07-09T07:15:00+00:00</published><updated>2020-07-09T07:15:00+00:00</updated><id>https://tomkadwill.com/rails-api-tutorial-part-3-building-a-post-endpoint</id><content type="html" xml:base="https://tomkadwill.com/rails-api-tutorial-part-3-building-a-post-endpoint"><![CDATA[<p>Welcome to the Rails 6 API tutorial. In this series we’ll walk through building a backend API using Ruby on Rails. The topics in this series include:</p>

<ol>
  <li><a href="/rails-api-tutorial-part-1-create-rails-api-project-and-routing">Creating a Rails API Project and Routing</a></li>
  <li><a href="/rails-api-tutorial-part-2-basic-controllers-and-models">Basic Controller and Models</a></li>
  <li><a href="/rails-api-tutorial-part-3-building-a-post-endpoint">Building a POST Endpoint</a></li>
  <li><a href="/rails-api-tutorial-part-4-http-status-codes">HTTP Status Codes</a></li>
  <li><a href="/rails-api-tutorial-part-5-active-record-validations">Active Record Validations</a></li>
  <li><a href="/rails-api-tutorial-part-6-destroy-controller-action">Destroy Controller Action</a></li>
  <li><a href="/rails-api-tutorial-part-7-exception-handling-in-controllers">Exception Handling in Controllers</a></li>
</ol>

<style>.embed-container { position: relative; padding-bottom: 56.25%; height: 0; overflow: hidden; max-width: 100%; } .embed-container iframe, .embed-container object, .embed-container embed { position: absolute; top: 0; left: 0; width: 100%; height: 100%; }</style>
<div class="embed-container"><iframe src="https://www.youtube.com/embed//rFHCMu2t4SY" frameborder="0" allowfullscreen=""></iframe></div>]]></content><author><name></name></author><summary type="html"><![CDATA[Welcome to the Rails 6 API tutorial. In this series we’ll walk through building a backend API using Ruby on Rails. The topics in this series include:]]></summary></entry><entry><title type="html">Rails API Tutorial, Part 4: HTTP Status Codes</title><link href="https://tomkadwill.com/rails-api-tutorial-part-4-http-status-codes" rel="alternate" type="text/html" title="Rails API Tutorial, Part 4: HTTP Status Codes" /><published>2020-07-09T07:15:00+00:00</published><updated>2020-07-09T07:15:00+00:00</updated><id>https://tomkadwill.com/rails-api-tutorial-part-4-http-status-codes</id><content type="html" xml:base="https://tomkadwill.com/rails-api-tutorial-part-4-http-status-codes"><![CDATA[<p>Welcome to the Rails 6 API tutorial. In this series we’ll walk through building a backend API using Ruby on Rails. The topics in this series include:</p>

<ol>
  <li><a href="/rails-api-tutorial-part-1-create-rails-api-project-and-routing">Creating a Rails API Project and Routing</a></li>
  <li><a href="/rails-api-tutorial-part-2-basic-controllers-and-models">Basic Controller and Models</a></li>
  <li><a href="/rails-api-tutorial-part-3-building-a-post-endpoint">Building a POST Endpoint</a></li>
  <li><a href="/rails-api-tutorial-part-4-http-status-codes">HTTP Status Codes</a></li>
  <li><a href="/rails-api-tutorial-part-5-active-record-validations">Active Record Validations</a></li>
  <li><a href="/rails-api-tutorial-part-6-destroy-controller-action">Destroy Controller Action</a></li>
  <li><a href="/rails-api-tutorial-part-7-exception-handling-in-controllers">Exception Handling in Controllers</a></li>
</ol>

<style>.embed-container { position: relative; padding-bottom: 56.25%; height: 0; overflow: hidden; max-width: 100%; } .embed-container iframe, .embed-container object, .embed-container embed { position: absolute; top: 0; left: 0; width: 100%; height: 100%; }</style>
<div class="embed-container"><iframe src="https://www.youtube.com/embed//yZM4oRZvltU" frameborder="0" allowfullscreen=""></iframe></div>]]></content><author><name></name></author><summary type="html"><![CDATA[Welcome to the Rails 6 API tutorial. In this series we’ll walk through building a backend API using Ruby on Rails. The topics in this series include:]]></summary></entry><entry><title type="html">Rails API Tutorial, Part 2: Basic Controllers and Models</title><link href="https://tomkadwill.com/rails-api-tutorial-part-2-basic-controllers-and-models" rel="alternate" type="text/html" title="Rails API Tutorial, Part 2: Basic Controllers and Models" /><published>2020-06-30T07:33:00+00:00</published><updated>2020-11-22T10:09:00+00:00</updated><id>https://tomkadwill.com/rails-api-tutorial-part-2-create-rails-api-basic-controllers-and-models</id><content type="html" xml:base="https://tomkadwill.com/rails-api-tutorial-part-2-basic-controllers-and-models"><![CDATA[<p>Welcome to the Rails 6 API tutorial. In this series we’ll walk through building a backend API using Ruby on Rails. The topics in this series include:</p>

<ol>
  <li><a href="/rails-api-tutorial-part-1-create-rails-api-project-and-routing">Creating a Rails API Project and Routing</a></li>
  <li><a href="/rails-api-tutorial-part-2-basic-controllers-and-models">Basic Controller and Models</a></li>
  <li><a href="/rails-api-tutorial-part-3-building-a-post-endpoint">Building a POST Endpoint</a></li>
  <li><a href="/rails-api-tutorial-part-4-http-status-codes">HTTP Status Codes</a></li>
  <li><a href="/rails-api-tutorial-part-5-active-record-validations">Active Record Validations</a></li>
  <li><a href="/rails-api-tutorial-part-6-destroy-controller-action">Destroy Controller Action</a></li>
  <li><a href="/rails-api-tutorial-part-7-exception-handling-in-controllers">Exception Handling in Controllers</a></li>
</ol>

<style>.embed-container { position: relative; padding-bottom: 56.25%; height: 0; overflow: hidden; max-width: 100%; } .embed-container iframe, .embed-container object, .embed-container embed { position: absolute; top: 0; left: 0; width: 100%; height: 100%; }</style>
<div class="embed-container"><iframe src="https://www.youtube.com/embed//nCb_mqAKusg" frameborder="0" allowfullscreen=""></iframe></div>

<h4 id="generating-a-controller">Generating a controller</h4>

<p>In <a href="/rails-api-tutorial-part-1-create-rails-api-project-and-routing">part 1</a> we added a route for <code class="language-plaintext highlighter-rouge">GET /books</code>. The next step is to add a controller for it. To do that we can use the Rails generator, via the command line we can do:</p>

<div class="language-plaintext highlighter-rouge"><div class="highlight"><pre class="highlight"><code>$ bin/rails g controller BooksController index
</code></pre></div></div>

<p>This will generate a controller called <code class="language-plaintext highlighter-rouge">BooksController</code> with an <code class="language-plaintext highlighter-rouge">index</code> action method.</p>

<p>This will also create an additional route which looks like <code class="language-plaintext highlighter-rouge">get books/index</code>. We don’t need that because we’ve already written the route so the generated route can be deleted.</p>

<p>The generated controller can be found under <code class="language-plaintext highlighter-rouge">app/controller/books_controller.rb</code> and looks like this:</p>

<div class="language-ruby highlighter-rouge"><div class="highlight"><pre class="highlight"><code><span class="k">class</span> <span class="nc">BooksController</span> <span class="o">&lt;</span> <span class="no">ApplicationController</span>
  <span class="k">def</span> <span class="nf">index</span>
  <span class="k">end</span>
<span class="k">end</span>
</code></pre></div></div>

<p>As you can see, <code class="language-plaintext highlighter-rouge">BooksController</code> is a regular Ruby class that inherits from <code class="language-plaintext highlighter-rouge">ApplicationController</code>. The inheritance provides the class with methods for handling incoming requests, params, etc.</p>

<p>You’ll notice that the class was also generated with an empty <code class="language-plaintext highlighter-rouge">index</code> method (Rails developers call this an ‘index action’). Even though the method is empty it does have a purpose. Any requests which hit <code class="language-plaintext highlighter-rouge">BooksController#index</code> will be served a successful response, with a 204 status code.</p>

<h4 id="calling-the-controller-action-via-curl">Calling the controller action via cURL</h4>

<p>We can test that via cURL:</p>

<div class="language-plaintext highlighter-rouge"><div class="highlight"><pre class="highlight"><code>$ curl http://localhost:3000/books -v
</code></pre></div></div>

<p>You should see that the cURL request returns a 204 status code. We can also look at the server logs:</p>

<div class="language-plaintext highlighter-rouge"><div class="highlight"><pre class="highlight"><code>Started GET "/books" for ::1 at 2020-10-27 19:31:35 +0100
Processed by BooksController#index as */*
Completed 204 No Content in 0ms (ActiveRecord: 0.0ms | Allocations: 32)
</code></pre></div></div>

<p>The server log shows that we made a GET request to <code class="language-plaintext highlighter-rouge">/books</code>, the request was processed by the <code class="language-plaintext highlighter-rouge">BooksController#index</code> method and it returned a 204.</p>

<h4 id="updating-the-controller-action-to-return-a-list-of-objects">Updating the controller action to return a list of objects</h4>

<p>Currently <code class="language-plaintext highlighter-rouge">BooksController#index</code> returns a successful response code but it doesn’t return any data. Let’s update the method to return a list of book objects:</p>

<div class="language-ruby highlighter-rouge"><div class="highlight"><pre class="highlight"><code><span class="k">class</span> <span class="nc">BooksController</span> <span class="o">&lt;</span> <span class="no">ApplicationController</span>
  <span class="k">def</span> <span class="nf">index</span>
    <span class="n">render</span> <span class="ss">json: </span><span class="no">Book</span><span class="p">.</span><span class="nf">all</span>
  <span class="k">end</span>
<span class="k">end</span>
</code></pre></div></div>

<p>We’ll use <code class="language-plaintext highlighter-rouge">render</code>, with the <code class="language-plaintext highlighter-rouge">json</code> option and pass in an ActiveRecord collection. In this case we use <code class="language-plaintext highlighter-rouge">Book.all</code> which will return all books in the database. We haven’t defined the <code class="language-plaintext highlighter-rouge">Book</code> model yet but we’ll do that next.</p>

<h4 id="generating-a-model">Generating a model</h4>

<p>We can generate a model using the Rails generate command. We just need to provide a name for our model and a list of attributes:</p>

<div class="language-plaintext highlighter-rouge"><div class="highlight"><pre class="highlight"><code>rails g model Book title:string author:string
</code></pre></div></div>

<p>In this example we’re generating a model called <code class="language-plaintext highlighter-rouge">Book</code> which has two fields, <code class="language-plaintext highlighter-rouge">title</code> and <code class="language-plaintext highlighter-rouge">author</code>, both of which are string fields. When we run the command Rails will generate a couple of files for us:</p>
<ul>
  <li>a migration file - <code class="language-plaintext highlighter-rouge">db/migrate/20200620150063_create_books.rb</code></li>
  <li>a model file - <code class="language-plaintext highlighter-rouge">app/models/book.rb</code></li>
  <li>some test files</li>
</ul>

<p>Here’s a look inside the files that were created:</p>

<h4 id="bookrb">book.rb</h4>

<div class="language-ruby highlighter-rouge"><div class="highlight"><pre class="highlight"><code><span class="k">class</span> <span class="nc">Book</span> <span class="o">&lt;</span> <span class="no">ApplicationRecord</span>
<span class="k">end</span>
</code></pre></div></div>

<p>As you can see there’s not much going on in this file, at the moment. We’re defining a <code class="language-plaintext highlighter-rouge">Book</code> class and inheriting from <code class="language-plaintext highlighter-rouge">ApplicationRecord</code>. Although we haven’t added any of our own logic, to this file, it still gives us a lot of capabilities. By inheriting from <code class="language-plaintext highlighter-rouge">ApplicationRecord</code> we’re giving <code class="language-plaintext highlighter-rouge">Book</code> all the power of Rails, by making it an <code class="language-plaintext highlighter-rouge">ActiveRecord</code> class.</p>

<p>Rails will map this Ruby class to the <code class="language-plaintext highlighter-rouge">book</code> table in our database. We can then use this model to access the database in our Rails application by calling methods. For example: <code class="language-plaintext highlighter-rouge">Book.all</code> will return all records.</p>

<h4 id="migration-file">migration file</h4>

<div class="language-ruby highlighter-rouge"><div class="highlight"><pre class="highlight"><code><span class="k">class</span> <span class="nc">CreateBooks</span> <span class="o">&lt;</span> <span class="no">ActiveRecord</span><span class="o">::</span><span class="no">Migration</span><span class="p">[</span><span class="mf">6.0</span><span class="p">]</span>
  <span class="k">def</span> <span class="nf">change</span>
    <span class="n">create_table</span> <span class="ss">:books</span> <span class="k">do</span> <span class="o">|</span><span class="n">t</span><span class="o">|</span>
      <span class="n">t</span><span class="p">.</span><span class="nf">string</span> <span class="ss">:title</span>
      <span class="n">t</span><span class="p">.</span><span class="nf">string</span> <span class="ss">:author</span>

      <span class="n">t</span><span class="p">.</span><span class="nf">timestamps</span>
    <span class="k">end</span>
  <span class="k">end</span>
<span class="k">end</span>
</code></pre></div></div>

<p>As well as the books model, we need to actually create a database table. To do that, Rails has generated a migration file for us which is like a blueprint for creating a database table. Here we’re creating a table called <code class="language-plaintext highlighter-rouge">books</code> with two fields: <code class="language-plaintext highlighter-rouge">title</code> and <code class="language-plaintext highlighter-rouge">author</code>, both of which are string fields. The table also includes <code class="language-plaintext highlighter-rouge">created_at</code> and <code class="language-plaintext highlighter-rouge">updated_at</code> timestamps. This table will be used to store books in our system.</p>

<p>If we try to run the server now it will fail because we have migrations in our codebase that haven’t been applied yet. So before we continue we should run the migrations. To do that, we can execute:</p>

<div class="language-plaintext highlighter-rouge"><div class="highlight"><pre class="highlight"><code>$ bin/rails db:migrate
</code></pre></div></div>

<p>This will apply the migration, creating the <code class="language-plaintext highlighter-rouge">books</code> table. You may be wondering which database Rails has updated. Rails ships with sqlite3 by default. When you run the migrations you may notice a new file appear called <code class="language-plaintext highlighter-rouge">development.sqlite3</code>. This is your development database.</p>

<h3 id="testing-the-controller-with-curl">Testing the controller with cURL</h3>

<p>Now that we’ve run the migrations we can test the controller/action again using the cURL request we ran before:</p>

<div class="language-plaintext highlighter-rouge"><div class="highlight"><pre class="highlight"><code>$ curl http://localhost:3000/books
[]
</code></pre></div></div>

<p>In the response you’ll notice we’re getting back an empty array. This is what we would expect because the controller is returning all books but we don’t have any books in the database to return. This is good because it means the response is consistent whether we have zero, one or multiple books being returned</p>

<h3 id="creating-some-database-records-in-the-rails-console">Creating some database records in the rails console</h3>

<p>To test the controller/action when we have records in the database, we can use the rails console. To start the console run:</p>

<div class="language-plaintext highlighter-rouge"><div class="highlight"><pre class="highlight"><code>bin/rails c
</code></pre></div></div>

<p>Then in the prompt you can create a <code class="language-plaintext highlighter-rouge">Book</code> by doing:</p>

<div class="language-ruby highlighter-rouge"><div class="highlight"><pre class="highlight"><code><span class="o">&gt;</span> <span class="no">Book</span><span class="p">.</span><span class="nf">create!</span><span class="p">(</span><span class="ss">author: </span><span class="s1">'J.K Rowling'</span><span class="p">,</span> <span class="ss">title: </span><span class="s1">'Harry Potter and the Philosophers Stone'</span><span class="p">)</span>
<span class="o">=&gt;</span> <span class="c1">#&lt;Book id: 1, title: "Harry Potter and the Philosophers Stone", author: "J.K Rowling", created_at: "2020-11-20 07:48:12", updated_at: "2020-11-20 07:48:12"&gt;</span>
</code></pre></div></div>

<p><code class="language-plaintext highlighter-rouge">create</code> is an ActiveRecord query method that allows us to create database records. It’s available to all of our ActiveRecord models and takes a hash of database fields as it’s arguments.</p>

<p>Now we can run the cURL request again to see some data in the response body:</p>

<div class="language-plaintext highlighter-rouge"><div class="highlight"><pre class="highlight"><code>$ curl http://localhost:3000/books
[{"id": 1, "title": "Harry Potter and the Philosophers Stone", "author": "J.K Rowling", "created_at": "2020-11-20 07:48:12", "updated_at": "2020-11-20 07:48:12"}]
</code></pre></div></div>

<div style="border-radius: 15px;background: #ffefab;padding: 20px;">
  <p>☎️ <a href="https://superpeer.com/tomkadwill">Book a slot for 1-to-1 help or pair programming</a></p>
  <p>🙏 <a href="https://buymeacoff.ee/tomkadwill">If you found this useful and want to support me, please consider a small donation. Thank you!</a></p>
  <p style="margin-bottom:0px">✉️ <a href="mailto:tomkadwill@gmail.com">If you want to work with me on a project, email tomkadwill@gmail.com</a></p>
<div>
</div></div>]]></content><author><name></name></author><summary type="html"><![CDATA[Welcome to the Rails 6 API tutorial. In this series we’ll walk through building a backend API using Ruby on Rails. The topics in this series include:]]></summary></entry><entry><title type="html">Rails API Tutorial, Part 1: Creating Rails API Project and Routing</title><link href="https://tomkadwill.com/rails-api-tutorial-part-1-create-rails-api-project-and-routing" rel="alternate" type="text/html" title="Rails API Tutorial, Part 1: Creating Rails API Project and Routing" /><published>2020-06-28T12:56:00+00:00</published><updated>2020-10-01T19:55:00+00:00</updated><id>https://tomkadwill.com/rails-api-tutorial-part-1-create-rails-api-project-and-routing</id><content type="html" xml:base="https://tomkadwill.com/rails-api-tutorial-part-1-create-rails-api-project-and-routing"><![CDATA[<p>Welcome to the Rails 6 API tutorial. In this series we’ll walk through building a backend API using Ruby on Rails. The topics in this series include:</p>

<ol>
  <li><a href="/rails-api-tutorial-part-1-create-rails-api-project-and-routing">Creating a Rails API Project and Routing</a></li>
  <li><a href="/rails-api-tutorial-part-2-basic-controllers-and-models">Basic Controller and Models</a></li>
  <li><a href="/rails-api-tutorial-part-3-building-a-post-endpoint">Building a POST Endpoint</a></li>
  <li><a href="/rails-api-tutorial-part-4-http-status-codes">HTTP Status Codes</a></li>
  <li><a href="/rails-api-tutorial-part-5-active-record-validations">Active Record Validations</a></li>
  <li><a href="/rails-api-tutorial-part-6-destroy-controller-action">Destroy Controller Action</a></li>
  <li><a href="/rails-api-tutorial-part-7-exception-handling-in-controllers">Exception Handling in Controllers</a></li>
</ol>

<style>.embed-container { position: relative; padding-bottom: 56.25%; height: 0; overflow: hidden; max-width: 100%; } .embed-container iframe, .embed-container object, .embed-container embed { position: absolute; top: 0; left: 0; width: 100%; height: 100%; }</style>
<div class="embed-container"><iframe src="https://www.youtube.com/embed//6KqbPJtA5O8" frameborder="0" allowfullscreen=""></iframe></div>

<h4 id="my-background">My background</h4>

<p>I’m a software engineer with 10 years industry experience and I’ve been building Ruby on Rails applications for much of that time. A lot of my time with Rails has been spent working on backend APIs. In this tutorial I want to share that knowledge.</p>

<h4 id="the-application">The application</h4>

<p>In this tutorial series we’re going to build an API backend for a book store. The API should allow us to do things like list the books we have in store, add new books to the store and delete books from our store’s database.</p>

<h4 id="installing-rails">Installing Rails</h4>

<p>This tutorial assumes you have Ruby and Rails 6 installed on your machine. If you haven’t done so already <a href="https://gorails.com/setup/osx/10.15-catalina">GoRails has a good guide on how to do that</a>.</p>

<h4 id="creating-a-new-rails-api-app">Creating a new Rails API app</h4>

<p>To build the application we’re going to be using Rails API-only. This allows us to generate a specialised Rails application that has all the functionality required for building APIs. For a full list of what Rails API-only applications include, you can <a href="https://guides.rubyonrails.org/api_app.html">read the docs</a>. At a high level, Rails API-only does not include the view rendering logic but does include controllers, models, routing, etc.</p>

<p>Let’s create a new Rails API-only application. I’m naming my application “nile” but you can call it whatever you want. To create the application run the following command in the terminal:</p>

<div class="language-plaintext highlighter-rouge"><div class="highlight"><pre class="highlight"><code>$ rails new nile --api
</code></pre></div></div>

<p>The output should look something like this:</p>

<div class="language-plaintext highlighter-rouge"><div class="highlight"><pre class="highlight"><code>      create
      create  README.md
      create  Rakefile
      create  .ruby-version
      create  config.ru
      create  .gitignore
      create  Gemfile
         run  git init from "."
Initialized empty Git repository in /Users/tomkadwill/workspace/nile/.git/
      create  app
      create  app/assets/config/manifest.js
      create  app/assets/stylesheets/application.css
      create  app/channels/application_cable/channel.rb
      create  app/channels/application_cable/connection.rb
      create  app/controllers/application_controller.rb
      create  app/helpers/application_helper.rb
      .
      .
      .
</code></pre></div></div>

<p>Rails has created all of the project files for us and installed the default gems.</p>

<p>Now we can <code class="language-plaintext highlighter-rouge">cd</code> into the project and open it in our editor (I’m using <a href="https://code.visualstudio.com/">VSCode</a> but you can use any good text editor):</p>

<div class="language-plaintext highlighter-rouge"><div class="highlight"><pre class="highlight"><code>$ cd nile
$ code .
</code></pre></div></div>

<h4 id="adding-the-first-api-route">Adding the first API route</h4>

<p>Now that we have initialized the Rails project we can start working on the first API endpoint. To start with, we’re going to be adding an endpoint to return all of the books we have in our store. The route should look like: <code class="language-plaintext highlighter-rouge">localhost:3000/books</code>. To do that we can add the following to <code class="language-plaintext highlighter-rouge">config/routes.rb</code>:</p>

<div class="language-ruby highlighter-rouge"><div class="highlight"><pre class="highlight"><code><span class="no">Rails</span><span class="p">.</span><span class="nf">application</span><span class="p">.</span><span class="nf">routes</span><span class="p">.</span><span class="nf">draw</span> <span class="k">do</span>
  <span class="c1"># For details on the DSL available within this file, see https://guides.rubyonrails.org/routing.html</span>
  <span class="n">get</span> <span class="s1">'/books'</span> <span class="o">=&gt;</span> <span class="s1">'books#index'</span>
<span class="k">end</span>
</code></pre></div></div>

<p>To see what this has done, we can run <code class="language-plaintext highlighter-rouge">rake routes</code> via the command line:</p>

<div class="language-plaintext highlighter-rouge"><div class="highlight"><pre class="highlight"><code>$ bin/rails routes
</code></pre></div></div>

<p>If you scroll to the top of the console output, you should see the new route:</p>

<div class="language-plaintext highlighter-rouge"><div class="highlight"><pre class="highlight"><code>Prefix Verb   URI Pattern           Controller#Action
books  GET    /books(.:format)      books#index
</code></pre></div></div>

<p>Our route is correct but we can re-write it in a nicer way:</p>

<div class="language-ruby highlighter-rouge"><div class="highlight"><pre class="highlight"><code><span class="no">Rails</span><span class="p">.</span><span class="nf">application</span><span class="p">.</span><span class="nf">routes</span><span class="p">.</span><span class="nf">draw</span> <span class="k">do</span>
  <span class="c1"># For details on the DSL available within this file, see https://guides.rubyonrails.org/routing.html</span>
  <span class="n">resources</span> <span class="ss">:books</span>
<span class="k">end</span>
</code></pre></div></div>

<p>The <code class="language-plaintext highlighter-rouge">resources</code> method will generate all 7 restful resources. If we run <code class="language-plaintext highlighter-rouge">rake routes</code> again we see:</p>

<div class="language-plaintext highlighter-rouge"><div class="highlight"><pre class="highlight"><code>Prefix Verb   URI Pattern           Controller#Action
books  GET    /books(.:format)      books#index
       POST   /books(.:format)      books#create
book   GET    /books/:id(.:format)  books#show
       PATCH  /books/:id(.:format)  books#update
       PUT    /books/:id(.:format)  books#update
       DELETE /books/:id(.:format)  books#destroy
</code></pre></div></div>

<p>This is great because Rails is able to generate all the routes we need via a single method call. However, we don’t need all of these routes so we can pair it down to just the one we need:</p>

<div class="language-ruby highlighter-rouge"><div class="highlight"><pre class="highlight"><code><span class="no">Rails</span><span class="p">.</span><span class="nf">application</span><span class="p">.</span><span class="nf">routes</span><span class="p">.</span><span class="nf">draw</span> <span class="k">do</span>
  <span class="c1"># For details on the DSL available within this file, see https://guides.rubyonrails.org/routing.html</span>
  <span class="n">resources</span> <span class="ss">:books</span><span class="p">,</span> <span class="ss">only: :index</span>
<span class="k">end</span>
</code></pre></div></div>

<p>Which will give us:</p>

<div class="language-plaintext highlighter-rouge"><div class="highlight"><pre class="highlight"><code>Prefix Verb   URI Pattern           Controller#Action
books  GET    /books(.:format)      books#index
</code></pre></div></div>

<h4 id="starting-the-development-server">Starting the development server</h4>

<p>Let’s test our new route. To do that we need to start the development server. Rails has a built in command for that:</p>

<div class="language-plaintext highlighter-rouge"><div class="highlight"><pre class="highlight"><code>$ bin/rails server
</code></pre></div></div>

<p>By default, the rails server will run on <a href="http://localhost:3000">http://localhost:3000</a>. If you browse to that url you will see the Rails welcome page.</p>

<h4 id="hitting-our-new-route">Hitting our new route</h4>

<p>However, this is an API application so we wont be interacting with it via the browser. Instead we can use cURL to make API requests. To make a GET request we can do:</p>

<div class="language-plaintext highlighter-rouge"><div class="highlight"><pre class="highlight"><code>$ curl http://localhost:3000/books
</code></pre></div></div>

<p>You should get an error <code class="language-plaintext highlighter-rouge">ActionController::RoutingError uninitialized constant BooksController</code>. That’s because the route we set up assumes there is a controller called <code class="language-plaintext highlighter-rouge">BooksController</code> and tries to route to straight to it. Don’t worry, in <a href="/rails-api-tutorial-part-2-basic-controllers-and-models">part 2</a> we’ll add the controller and have the whole API request/response working.</p>

<div style="border-radius: 15px;background: #ffefab;padding: 20px;">
  <p>☎️ <a href="https://superpeer.com/tomkadwill">Book a slot for 1-to-1 help or pair programming</a></p>
  <p>🙏 <a href="https://buymeacoff.ee/tomkadwill">If you found this useful and want to support me, please consider a small donation. Thank you!</a></p>
  <p style="margin-bottom:0px">✉️ <a href="mailto:tomkadwill@gmail.com">If you want to work with me on a project, email tomkadwill@gmail.com</a></p>
<div>
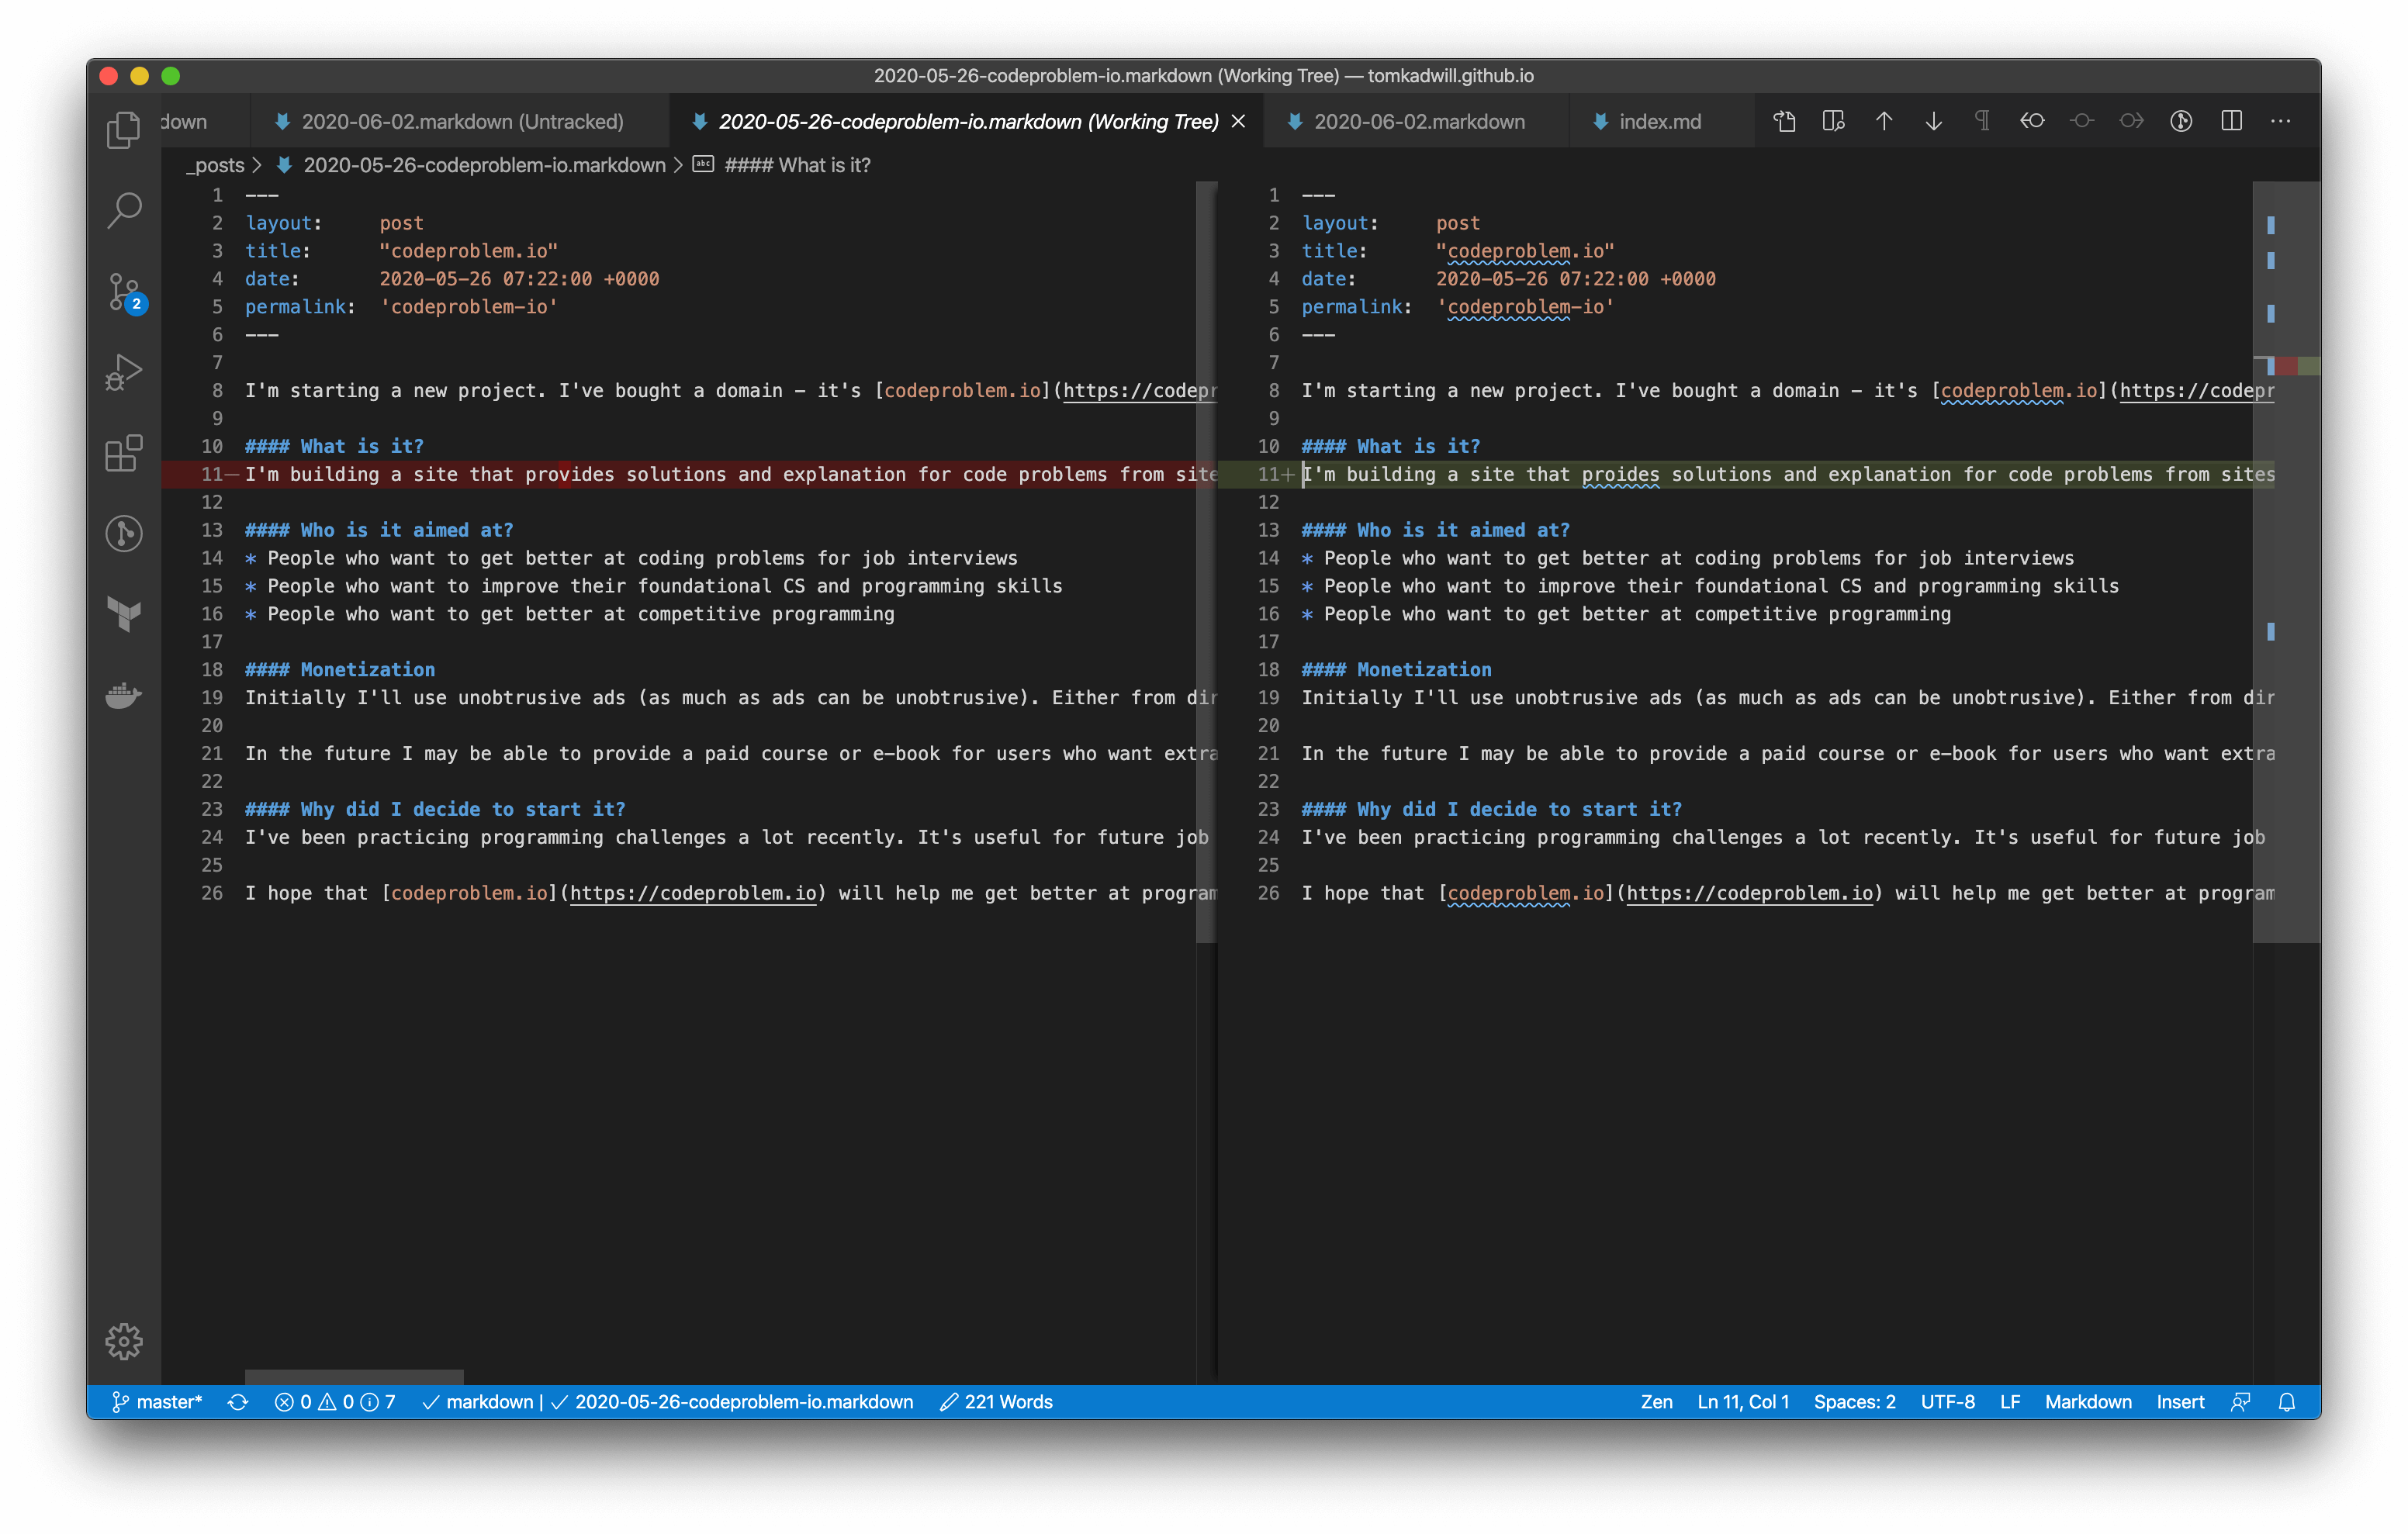
</div></div>]]></content><author><name></name></author><summary type="html"><![CDATA[Welcome to the Rails 6 API tutorial. In this series we’ll walk through building a backend API using Ruby on Rails. The topics in this series include:]]></summary></entry><entry><title type="html">VS Code Disable ‘Working Tree’ Git Preview Window</title><link href="https://tomkadwill.com/vscode-disable-working-tree-git-preview-window" rel="alternate" type="text/html" title="VS Code Disable ‘Working Tree’ Git Preview Window" /><published>2020-06-02T07:46:00+00:00</published><updated>2020-06-02T07:46:00+00:00</updated><id>https://tomkadwill.com/vscode-disable-working-tree-git-preview-window</id><content type="html" xml:base="https://tomkadwill.com/vscode-disable-working-tree-git-preview-window"><![CDATA[<p>VS Code’s built in source control support is fantastic. However, the working tree preview feature annoys me. When you click on a file, from the source control sidebar, you’ll see a diff preview like this:</p>

<p><img src="/assets/vscode-disable-working-tree-git-preview-window/working-tree-diff.png" alt="Working Tree Diff" /></p>

<p>This slows me down because I use the source control sidebar for navigation. I like to jump to edited files and tidy them up before committing to GitHub.</p>

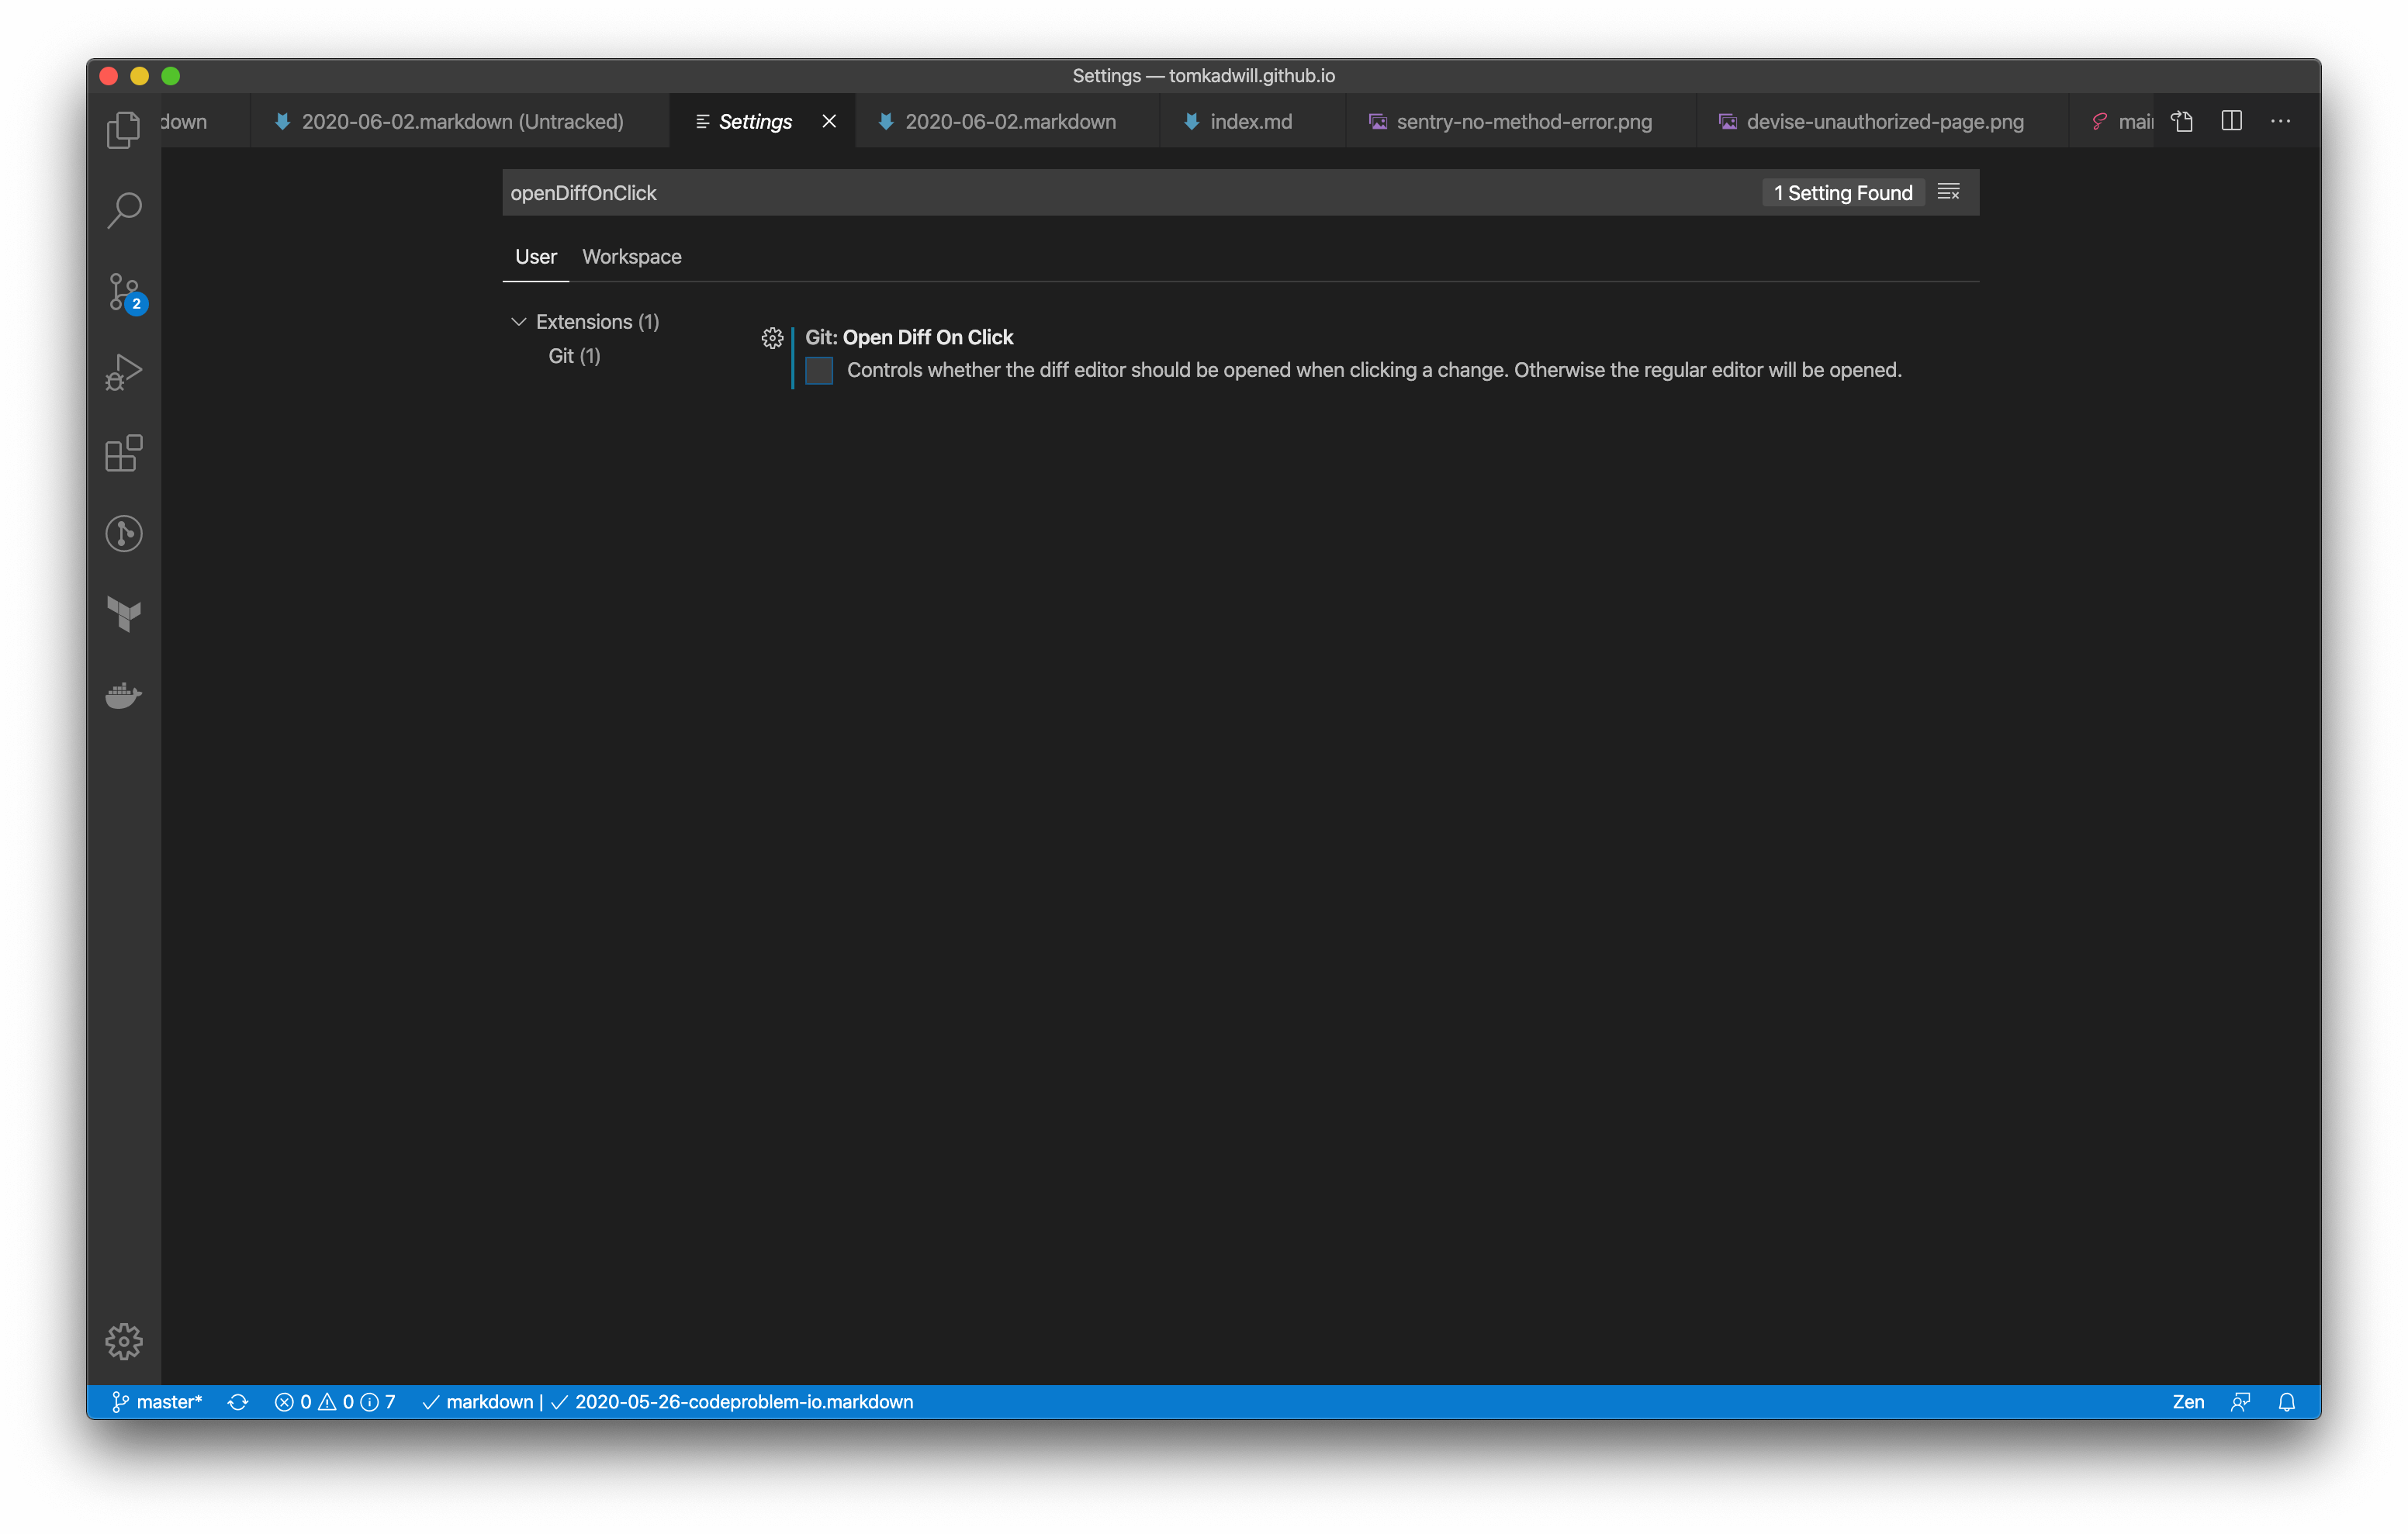
<p>You can disable this feature by searching for <code class="language-plaintext highlighter-rouge">openDiffOnClick</code> in settings and un-checking it:</p>

<p><img src="/assets/vscode-disable-working-tree-git-preview-window/open-diff-on-click.png" alt="openDiffOnClick" /></p>

<p>With <code class="language-plaintext highlighter-rouge">openDiffOnClick</code> disabled you’ll jump straight to files for editing. Just like you would when navigating via the file explorer.</p>]]></content><author><name></name></author><summary type="html"><![CDATA[VS Code’s built in source control support is fantastic. However, the working tree preview feature annoys me. When you click on a file, from the source control sidebar, you’ll see a diff preview like this:]]></summary></entry></feed>